Showing posts with label Andre Le. Show all posts

Tuesday, March 25, 2014

Andre Le: A8 Interactive Blocks (pt 2)

This post is a continuation of the Interactive Blocks projects posted here: http://hapticaction.blogspot.com/2014/03/andre-assignment-8-interactive-blocks.html

In my previous post, I expressed interest in using LEDs as sensors using a phenomenon called parasitic capacitance. Given that I did not have two sets of micro-controllers lying around to interact with each other, I explored other things that I had sitting around.

I've always been interested in working with camera flashes. The sound while charging that it makes is both terrifying and provides an anticipatory signal to people letting them know that its getting ready for a bang.

Typically, these flashes are trigged manually with physical switches, but I wanted to see if I could get an Arduino to trigger it using other sensors.

The Hack:


The first step was to extract the flash unit from the disposable camera. Looking around the edges, I was able to find a few clips that allowed me to detach the front and back housings. Visually, you can see where the contacts are to charge the capacitor and where it's triggered.


Next, I had to test my assumptions of how it worked with a piece of metal. I charged and discharged the flash in the video above. After I confirmed that it worked, I went to prototype a circuit that contained a relay, transistor to trigger the relay, and a photoresistor as the sensor.


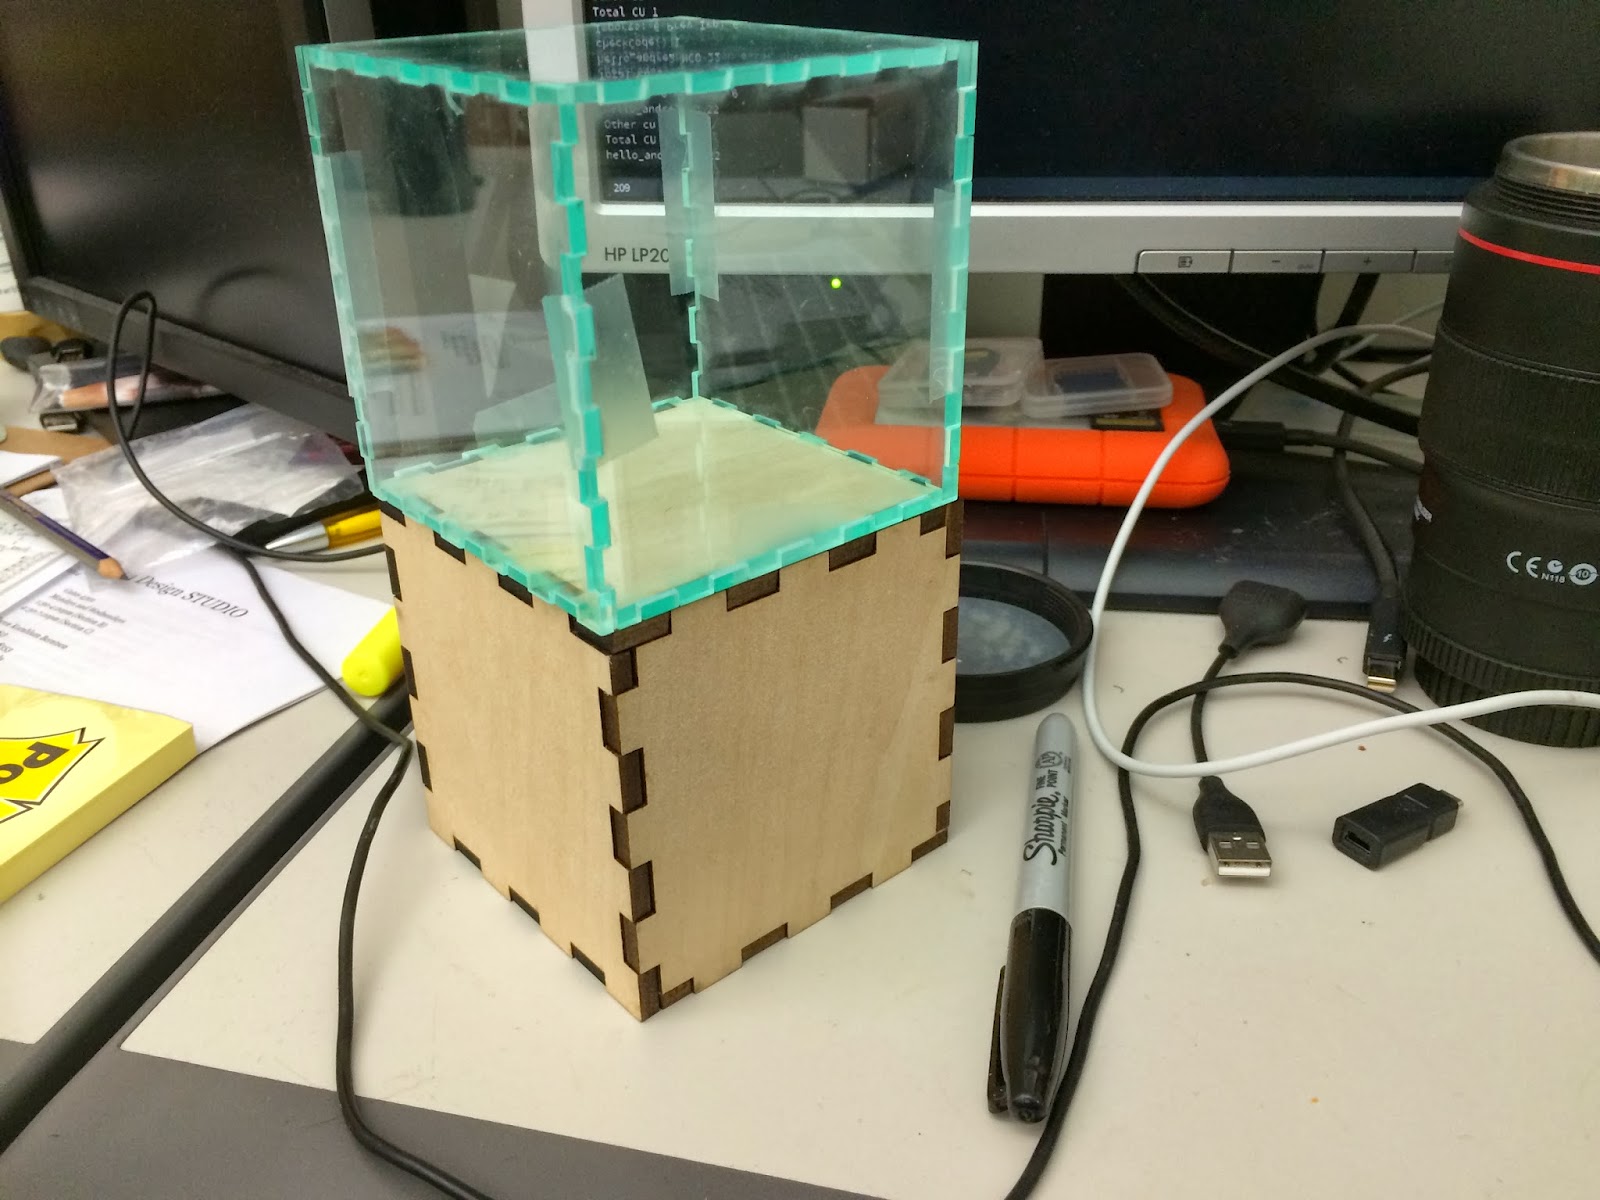
I had to keep in mind that I needed to provide a minimal amount of connections across the two blocks. I managed to share a lot of connections on the circuit board and only expose pins for power, ground, relay signal, and sensor signal. 


This allowed me to use screws to double up as both standoffs and connections to the Arduino in the wooden box. 


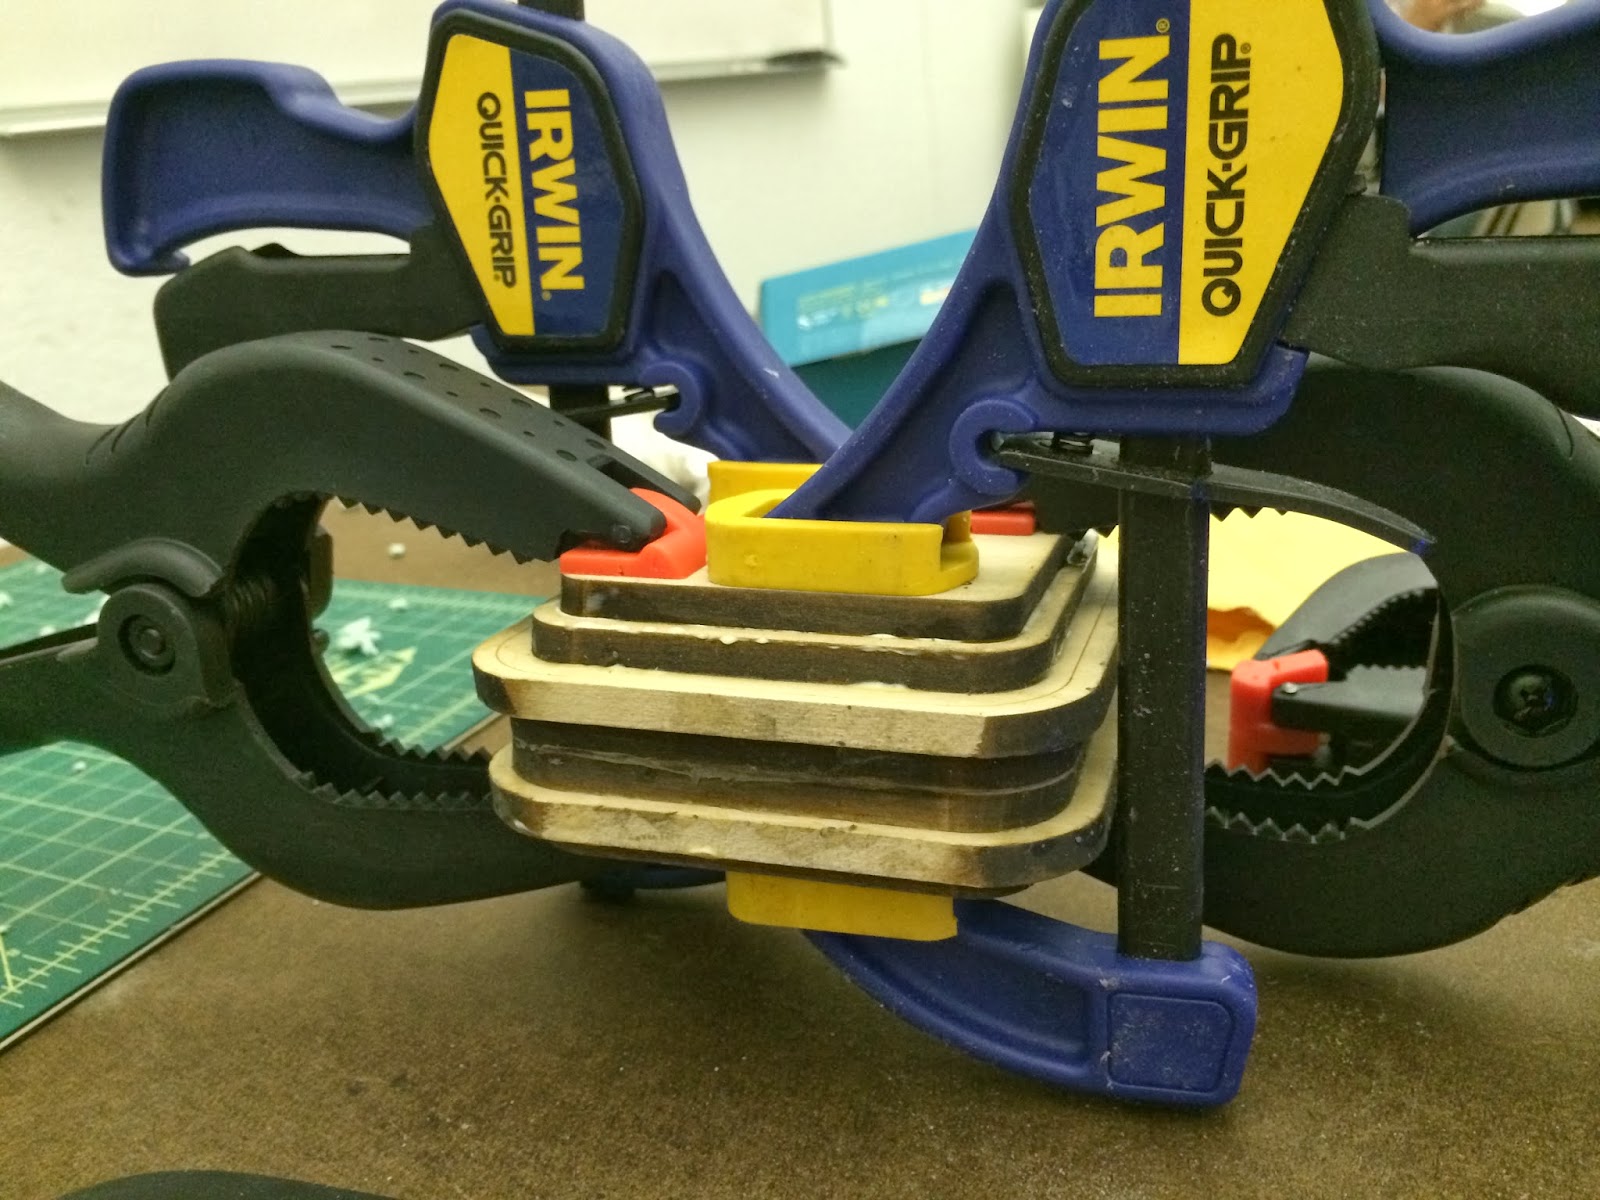
To make connections on the wooden side of the box, I needed a way to insert the screws into the box and make a solid connection. The conductive material would need to be fluffy enough to fill the holes, but give way to the screws as they were seated together. I tested some steel wool used for dishwashing with my multimeter and realized that the resistance was very low. I took several bundles of steel wool and soldered jumper wires to them to make the final connections to the Arduino. This solution worked well for my tests and is a novel way to connect two objects, but I would definitely need some safeguards to prevent shorting in a production environment.

The screws were also keyed, arranged in a pattern that would not allow you to put them in the wrong way.


Independently, the cubes do not do anything. But once you mate the two cubes together, the unit acts as a display case for the circuit board. The wooden box hides an Arduino and battery, which provides the clear box with the computational power to determine when and how the flash is activated. The Arduino initializes by taking a light reading of the environment. If the light changes drastically, the Arduino is "spooked" and discharges the flash.

Thursday, March 6, 2014

Andre - Assignment 8 Interactive Blocks [WORK IN PROGRESS]

This assignment requires us to create two blocks of differing materials and make it interact with each other.

Circuit design research:

In the research phase of this project, I found myself particularly fascinated with inputs/sensors that also can double up as outputs/emitters. In the previous project I was able to use a piezoelectric sensor as a speaker. For this project, I wanted to follow the same minimalist design process and find other ways to do this.


I remembered seeing a blog post from hackaday.com in 2006 that discussed using LEDs as sensors. In addition, when quickly switching back and forth between being an input and output, LEDs could be used as an interactive display. [MIND BLOWN]


Laser Command from Eiji Hayashi on Vimeo.

As with just about everything in this field, all things lead to CMU. After digging a little deeper, I found a project called Laser Command done by a former student at CMU named Eiji Hayashi. He lists some really great documentation on how he achieved a laser to LED Matrix interface.


Finally, to further reduce my footprint within the box, I wanted to things further and create my own board using the Atmel ATTiny85 microprocessor. I found great documentation from our friends at the MIT Media Lab's research group called High Low Tech.


At this point, I've successfully wired up an ATTiny programmer, upload sketches, and run the chip at 8mHz standalone on 3.7V lithium batteries. The footprint is tiny. (Picture coming soon!)


Building the boxes:

I sourced my materials from the local art store and DFab down in Margaret Morrison. I used 3/16" basswood for one box and 1/8" glass-tinted acrylic for the other. To build the template, I used a site called Box Maker. I also used a digital caliper to measure the material thickness. The laser cutters down in DFab were a little worn-in and required 3-4 passes to cut through the material. This caused the friction-fit finger joints to fail and require gluing. Here's an image of it in progress:


Status update:

At this point, I've got all of the components together, research complete, but I have run out of time to fully finish this piece in time. I've put up all of my documentation and research in hopes that it will help others with their projects.


Tuesday, March 4, 2014

Slow Motion Egg Drop Tests


This is slow motion video footage of an "Egg Drop" assignment for Haptic Action at Carnegie Mellon University. The goal was to create an object out of wood, metal, or plastic that would survive a 25ft free fall. In addition, the object must contain an Arduino circuit with at least 1 input and 1 output, and must have its own power supply. We were not allowed to append padding on the outside of our object. Both aesthetics as well as function were factors in the grading criteria.

About my box:
The box was created from basswood which was laser cut into slices of the box, then wood glued and clamped overnight. Pilot holes were drilled and countersunk for screws that went through 3/4 of the box. The top layer of the box was removable to access an inner compartment. The box contained an Arduino micro, a 9V battery, and a piezoelectric sensor that doubled as a speaker to play the beginning of Mario's theme song.

Thursday, February 27, 2014

Looking Out: CloudWash


In this project, Berg (creators of the LittlePrinter) decides to tackle the washing machine. The video is an excellent example of how to document and describe a design process. It was very interesting to see this project evolve over time as they considered some of the human and real-world issues related to laundry. Make sure you watch to the very end. They talk about how their line of thinking on tangible interactions expands far beyond just the laundry machine.

Looking Out: SolidCon


SolidCon is a conference entirely dedicated to innovations in the ubiquitous physical computing space and designing for the post-screen world. It takes place May 21-22, 2014 in San Francisco and is made up of well respected giants such as Joi Ito (Director of MIT Media Lab) and Ivan Poupyrev (Formerly at Disney Research) to name a few. I think it would be a SOLID conference to attend, especially for those interested in the haptic interaction space.

Andre Le - Egg Drop


For this Egg Drop project, we needed to design a shock proof enclosure for an Arduino circuit that was to be dropped off of the top of the 3-story CFA building. 

I tried experimenting with techniques that I have not tried using before and improvising along the way. 

I started with the circuit design:


The goal of this was to use the space savings gained by the Arduino Micro to the best of my ability. I used a piezoelectric sensor as an input to detect vibrations. This eliminated the need for an external switch to activate the output. I also knew that the piezoelectric sensor could be turned into a transducer by applying voltage through it. Unfortunately, I needed PWM pins to create the sounds and Analog pins to read the input. However, after digging into the documentation for the ATMega328 chip onboard the Arduino, I realized that it has several pins that can be used as analog input as well as PWM output. After some breadboarding, I found that I could the piezo sensor into both an input AND output simultaneously.


By keeping the number of components down and the footprint small, I could make a smaller and lighter box in hopes that it would reduce the impact of the fall. I measured the size requirements with my digital calipers and created a tool path for the laser cutter with those dimensions in mind.

The material I used was basswood, with the hopes that the soft wood would be less brittle than a dense hardwood. The slices were aligned and glued together with wood glue. Holes were drilled for the screws and countersunk to be flush with the surface. The final piece was sprayed with Shellac to protect the surface. 

Let's hope this isn't the last time we see this alive.


Thursday, February 13, 2014

Looking Out - Soccer Guitar Hero

Looking Out - Slow Motion Train Stops

Adam Magyar's Slow Motion Train Stops


Adam Magyar is a new media artist that created a high speed slit-scanning camera rig himself to film interesting slices in time. He took his rig on to a subway and filmed out of the window while the trains would come to a screeching halt. His high-speed rig allowed him to capture footage and allowed him to slow/stop time and capture the every day candid expressions of people commuting in New York.

Looking Out - Andre Le

The Making of Robocop's 3D printed suit


This article details the interesting process of taking a cultural cinema icon such as Robocop and re-imagining his image for a modern day audience. Martin Whist and his team designed this new suit taking inspiration from modern materials such as graphene. In their process, they considered the time period in which the original suit was designed and the design thinking behind it. Inspired by that, they reflected on the current state of industrial design and beautifully merged the nostalgic with the futuristic.